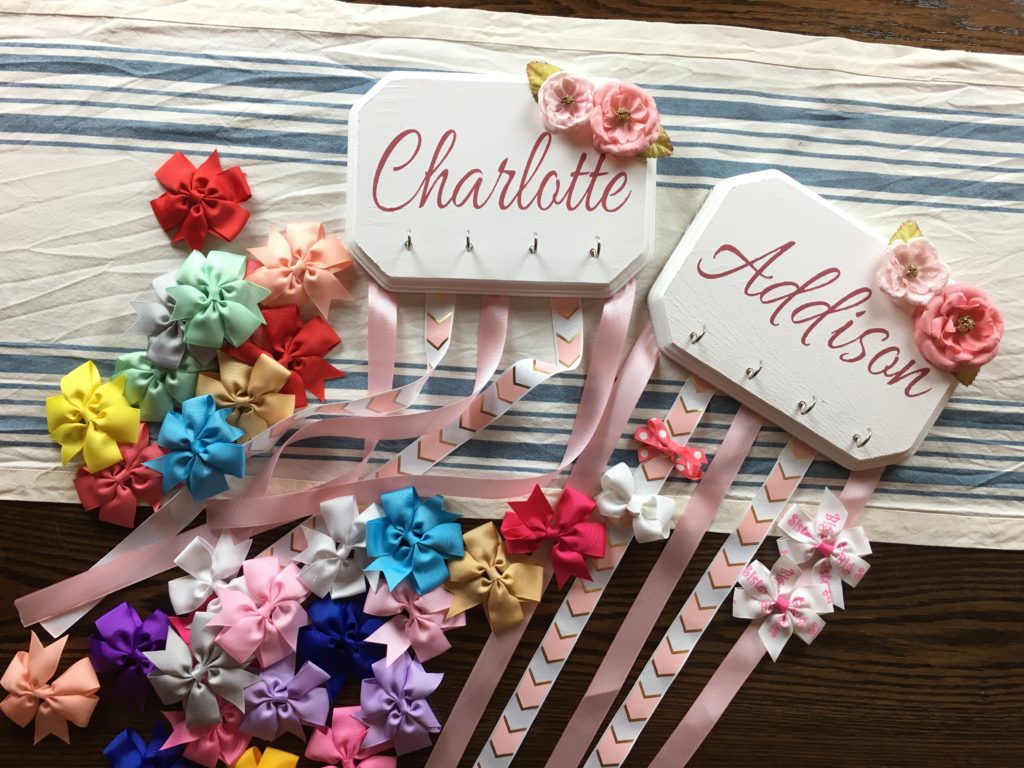
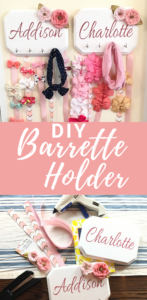
These DIY barrette holders will organize and display all your bows and bobbles.
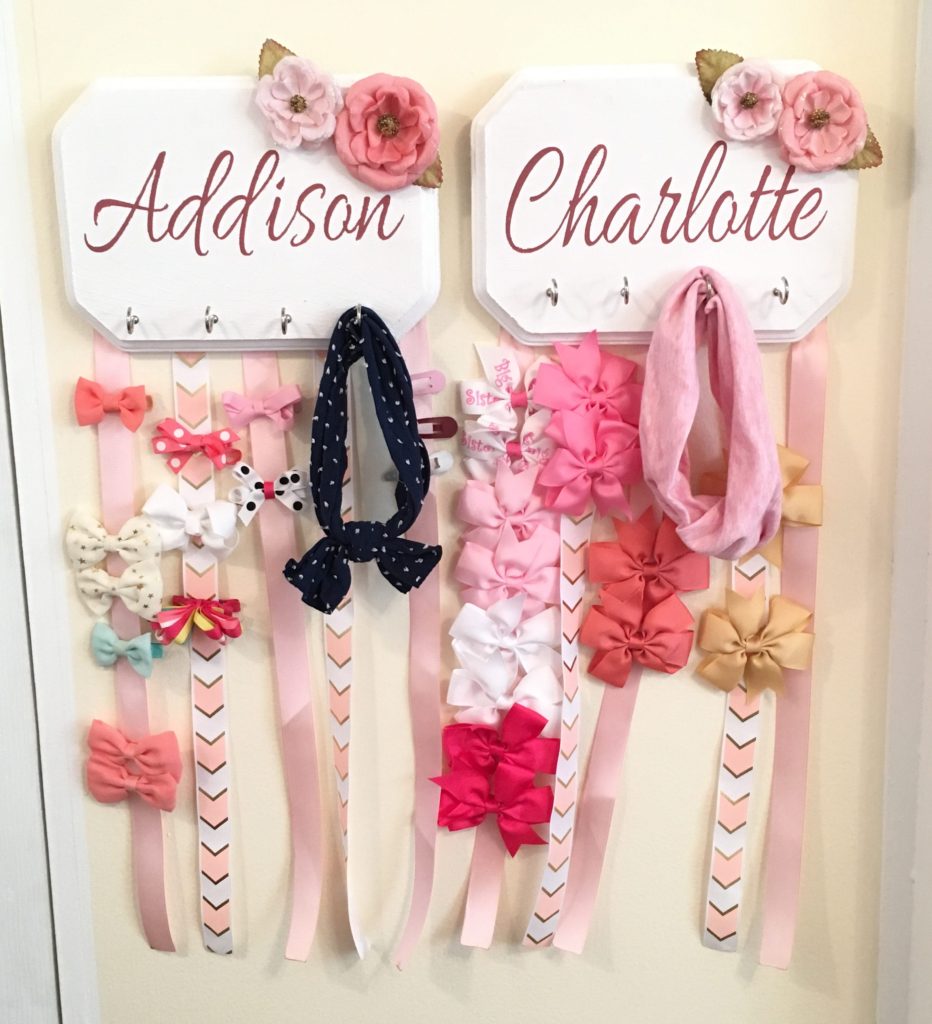
Ah, little girls. All the bows, dresses and pretty little things are so much fun!I LOVE decking my babes out in girly things. But man-oh-man is it hard to store all those little odds and ends for their hair! Enter the DIY Barrette Holder I created. It holds everything efficiently, and looks good while doing it!
Disclosure: Some of the links below are affiliate links, meaning, at no additional cost to you, I will earn a commission if you click through and make a purchase. Get my full disclosure here.
DIY BARRETTE HOLDER VIDEO
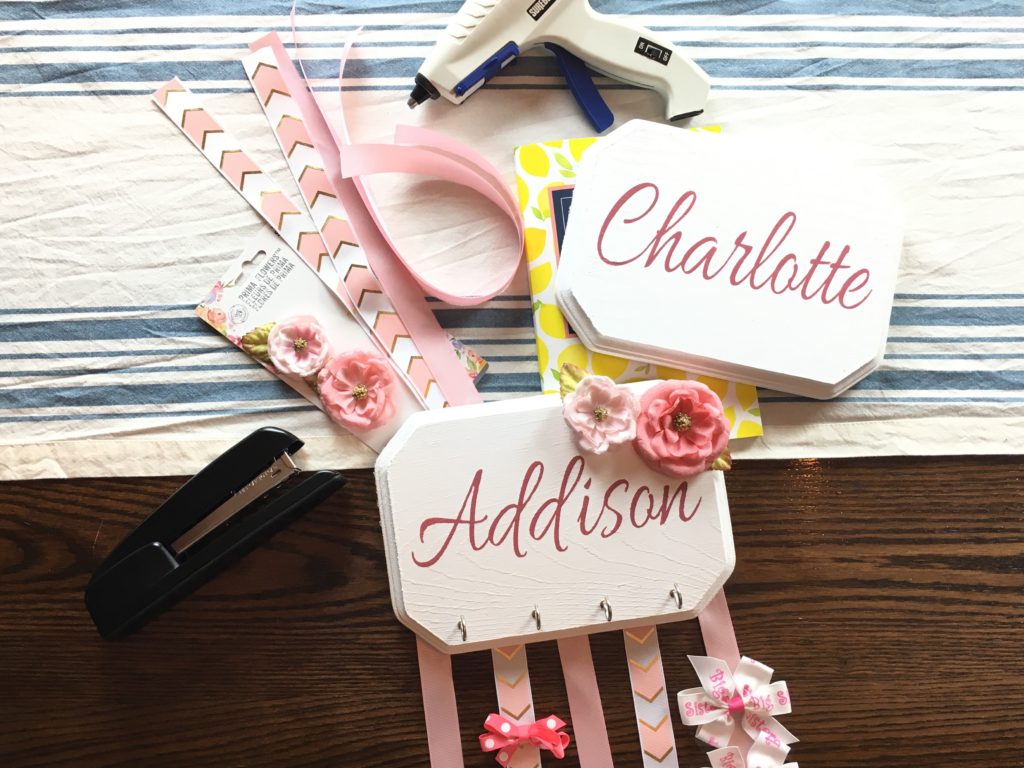
DIY BARRETTE HOLDER SUPPLIES
- Piece of wood. I purchased mine from Hobby Lobby, but most craft stores have some version of them.
- Ribbon. I prefer grosgrain ribbon.
- Paint + Brush. The craft store has tons to choose from. Here’s a tip: Sometimes I buy the sample sized latex paints from home improvement stores. You get MUCH more bang for your buck.
- Décor (optional). I used some flowers. I couldn’t find the exact same as what I had, but these are very similar.
- Stencil (optional). I made my own vinyl stencils on my Cricut. More on that in a minute.
- Hot Glue Gun
- Stapler + Staples
- Cup Hooks
- Sawtooth Picture Frame Hangers
- Awl or a nail (any size)
- Lighter
1. PAINTING YOUR DIY BARRETTE HOLDER
First you need to get your wood base painted. I use sponge brushes. I like them because they don’t leave any brush strokes. You’ll probably need 2 coats of paint.
Next you need to get whatever wording you prefer onto your wood base. I did each of my girls’ names. You can get as involved in this step as you would like. If you don’t want to freehand letter, you can cut out a vinyl stencil on your Cricut if you have one like I did. If you would like more information on doing that, you can find a YouTube video here that shows you how to create the stencil, and another video here that shows you how to use transfer tape to get it in place on your wood base.
Want to see how to letter a sign without a stencil? Here’s a video for that!
2. ATTACHING YOUR RIBBON TO YOUR DIY BARRETTE HOLDER
Next you’ll want to figure out how long you want your ribbon, as well as how many pieces will fit well hanging from your wood base. I decided to make my ribbon 18″ long, so I cut each of the pieces, then quickly ran a flame from a lighter over the cut ends to melt them slightly so they don’t fray. I prefer to use grosgrain ribbon because it does this well. But be careful and don’t hold the flame on there – just pass over it fairly quickly. You don’t want to hold it to the ribbon anywhere near long enough to even singe it and turn it black, let alone actually light it on fire.
Next draw a horizontal line across the back of your wood base as a guide that will show you where each ribbon should sit. You’ll want it to be at least 1″ from the bottom of the sign. Layout your ribbon spacing at this point too.
Open your stapler up (sometimes there’s a latch/switch you have to press on the back or bottom). These wood bases from craft stores tend to be quite soft, so it will be easy to put a couple staples horizontally into the ribbon to secure it onto the wood
3. ATTACH SAWTOOTH HANGERS TO YOUR DIY BARRETTE HOLDER
Draw another line horizontally across the back of your wood base, this time about 1/4″ from the top. Use it to line up 2 sawtooth hangers – one on the left and one on the right. I like to hold the bracket in place and use my awl to make a little indentation where each screw will go so I can easily start the screw. This also prevents the wood from splitting. If you don’t have an awl, you can use a nail instead.
Screw both of your sawtooth hangers on. I use 2 for stability, because this barrette holder will be touched frequently.
4. PUT HOOKS ON YOUR DIY BARRETTE HOLDER
Next it’s time to put the cup cooks on the front of the barrette holder. You can do as many or as few as you would like. They’re great for hair ties and headbands.
Once you know where you plan to put them, push your awl into the wood to start your hole. This makes it easier to start screwing the cup hook in, and also prevents the wood from splitting. If you don’t have an awl, you can use a nail.
If you are using something harder than soft craft grade wood from a craft store, you may need to use a hammer on the back of the awl to get the hole started.
5. ATTACH YOUR DECOR TO YOUR DIY BARRETTE HOLDER
Next it’s time to attach any décor you want to use. I used a hot glue gun to attach 2 flowers. I think it’s best to keep the decorations simple, because once all the hair accessories are on here it will look plenty decorated!
SHOP THIS POST
Décor Flowers
Cricut Air 2 (Cutting Machine)
Cup Hooks
Sawtooth Picture Frame Hangers
Sponge Brushes
Awl
Large Pack of Hair Bows
Cordless Glue Gun
RELATED POSTS
PIN IT FOR LATER
Thanks for stoppping by today. Stay tuned, as I have so much more to share with you.
XO,
Morgan
The Cheeky Homemaker
Love this. Morgan, you explain everything so well and you were so perfect at this. Really enjoyed the ideas also watched the key holder video and it was great too
Thanks Christie!! I’m so happy to hear you enjoyed both of them, and also that my explanation is coming across well. 😉